
Beginners Guide to Knife Making - The Basic Knife Making Process.
Beginners Guide to Knife Making - Introduction
To the beginner, knife making can seem daunting. The knife making process seems very complex and there can be a lot of confusion over the steps required and the order they should be undertaken in.
In this Journal entry we explore the knife making process from start to finish. The process described works - it's the one I use myself - but its important to realise that there are alternate ways to do things that are equally valid. For example, the process described has creating the bevels before heat treatment. If you were making a very thin kitchen knife it is perfectly valid to heat treat the blade before creating the bevels to help prevent warping. This approach does however assume that the correct tools are available to allow hardened steel to be removed.
Beginners Guide to Knife Making - What is a process?
If you look in a Dictionary, you will find a definition similar to this:
“ A series of actions or steps taken in order to achieve a particular end”
So in our context, this can be defined as starting with the raw materials and finishing with a useable knife, potentially with a sheath or something else to keep it in.
Beginners Guide to Knife Making - Why is following a process valuable?
Even if you are making a single item, following an ordered set of steps sets you up for success.
Following a process has the following common benefits:
Consistency - Knife to knife, batch to batch, date to date, following a process aids consistency. If you follow the same process each time you will get (within a given set of circumstances) the same result. Once you have determined the formula that works for you, why change it unless you really have to? Varying the steps you take and the way you take them can quickly lead to mistakes that can be easily avoided.
Efficiency - following the same steps in the same way allows you to set up your work space, and the flow of work through it, in a very efficient way, minimising the time spent swapping from tool to tool or technique to technique. A process also helps if you have limited time available and your work is a bit stop/start. If you are following a known process you can put something down and pick it up again, sometimes weeks later, and know exactly where you are and what work is needed next.
Minimise rework - closely related to consistency, following a process that works for you minimises the opportunities for mistakes to occur which in turn minimises the need to rework an earlier step or worse scrap all of the work you have done to date.
Reduces overwhelm - A defined process breaks down a complex somewhat overwhelming task into easy to understand and follow steps that run in a logical order to meet the ultimate goal. We have all heard the question ‘how do you eat an elephant?’ Well a process would certainly help.
Helps with training and development - Whilst not of immediate benefit to a beginner, those who have aspirations to ultimately set up their own knife making business, will find that defining processes for each stage will greatly help explain those stages to new workers and aid with their overall development as they progress through their time.

Beginners Guide to Knife Making - Process Steps
So what are the logical steps to get from A to B and end up with your first finished knife that you can be truly proud of?
As this is a beginners guide to knife making, the process defined allows a knife and sheath to be made utilising only simple hand tools. Access to electric hand tools or heavy machinery can have the potential to modify the process, as is described in the kitchen knife example previously given, but typically, power tools will simply speed up each step. Bear in mind that quick work can also equal quick mistakes!
The basic knife making steps are:
Design your knife.
Profile the blade to your chosen shape
Shape the edge
Heat treatment
Finish the blade
Put a handle on
Sharpen
Make a sheath
Each of these steps is described in more detail below.

Beginners guide to Knife Making process Step 1 - Design your knife
This is probably the least thought about but most important stage of the knife making process, being the stage where fundamental questions should be asked that will determine not only the type of knife you make, but the materials you use and the manufacturing methods employed.
The key questions are:
What do you intend to use it for?
What are the key features needed to meet that purpose?
How will you make it?
What blade material will you use?
How will you heat treat it?
The answers to these and similar questions will allow a design to be developed that suits the intended purpose and is within the capabilities of the tools and materials you have available.
Let’s consider these questions in more detail.
What do you intend to use it for?
The expectations and demands placed on an outdoor knife are different from those placed on a kitchen knife, which are different again from those placed on a general purpose utility knife mainly used to open cardboard boxes.
What are the key features needed?
The answer to the previous question drives you to the key features needed to satisfy that purpose. This is where the knife design really becomes optimised. A saw back might be a requirement on a survival knife, whereas, a sushi chef may want suction release grooves on the blade to allow very thin slices to made without the food sticking to the blade.
How will you make it?
This question talks to your personal capabilities, the skills and experience you have, the tools you have and, where you will be making it. At the extremes, you may be entirely shaping your knife by hand using files or, at the other extreme, you may have access to a fully outfitted industrial workshop with highly specialised machinery. Whilst each approach is equally viable, a workshop full of machines has the potential for greater flexibility in your approach - if you have the skills and knowledge to use them.
Your chosen manufacturing method may dictate the need for a full CAD outline drawing for computer aided machining or a simple sketch for home workshop use.
What blade material will you use?
This and the next question (heat treatment) closely link into the ‘how will you make it’ question. Some blade steels are relatively easy to work by hand. Others are a lot tougher and require more effort to shape.
Environmental considerations are also a factor here. If your knife is likely to be subjected to environmental extremes or is regularly used in a kitchen, stainless steel may be a good choice. If you are producing a functional art piece where aesthetics are a driving factor then pattern welded steels may be the way forward.
Cost is also a consideration. Specialised knife steels can be very expensive compared to standard high carbon steels. Do you want to spend lots of money on a material you do not have the tools or skills to utilise to its full potential?
How will you heat treat it?
Heat treatment is probably the second most important consideration after the purpose of your knife. If you are just starting out and are using a relatively rudimentary home set up, properly heat treating some of the specialised steels will be beyond your capabilities.
Significant investment in heat treatment equipment and the associated safety equipment is required to get the best from these specialist steels. This level of investment may not be appropriate for your circumstance or your place on the knife making journey. In this case an equally viable approach is to send your blade out for heat treatment. In this way, you could still choose to use a specialised steel if the need dictated it.
At the end of this step you will have made all of the critical decisions around your knife, making the subsequent steps relatively straight forward.

Beginners guide to Knife Making process Step 2 - Profile the blade to your chosen shape
This step is where the actual knife making starts. Once you have obtained your chosen steel, it needs to be worked to form the overall shape of the knife.
Common methods of profiling the blade to shape in the home workshop include:
Stock removal
Forge to shape
Drill holes
The two major differences in approach are stock removal and forging.
In stock removal, material is machined away until the final shape is obtained. The simplest form of stock removal is filing too shape by hand.
More specialised industrial methods include:
Water jet cutting
Laser cutting
EDM (wire eroding)
In forging, the material is manipulated, usually through heating and hammering, until the final shape is achieved.
Regardless of the method chosen, the objective is to remove or move excess material until you end up with a finalised shape that meets your needs.

Beginners guide to Knife Making process Step 3 - Shape the edge
Without power tools, it is less effort to work the blade to form the grind prior to heat treatment. Knife blades once heat treated, especially those made from specialised steels, are very close to the hardness of a standard file.
Common grind and edge shapes are:
Convex
Scandi
Sabre
Full flat
Concave
More information is available on these shapes here:
![Best Bushcraft Knife Key Features [Free buyers guide]](https://images.squarespace-cdn.com/content/v1/5fb161311ca05f08cb554748/1605785045535-666XGPE9EH5JLLA9EHR4/Best+Bushcraft+Knife+key+features.png)
As previously mentioned, this is one area where the process can be changed if you have the need and the appropriate tools and equipment to make it viable.

Beginners guide to Knife Making process Step 4 - Heat treatment
Heat treatment is a mini process in its own right. The stages listed below are followed to achieve a correctly heat treated blade:
Anneal
Normalise
Harden
Temper
The need for each listed stage or the exact parameters undertaken during each stage differ for each steel and the desired result.
A more detailed introduction to knife heat treatment will be the subject of a future Journal entry.

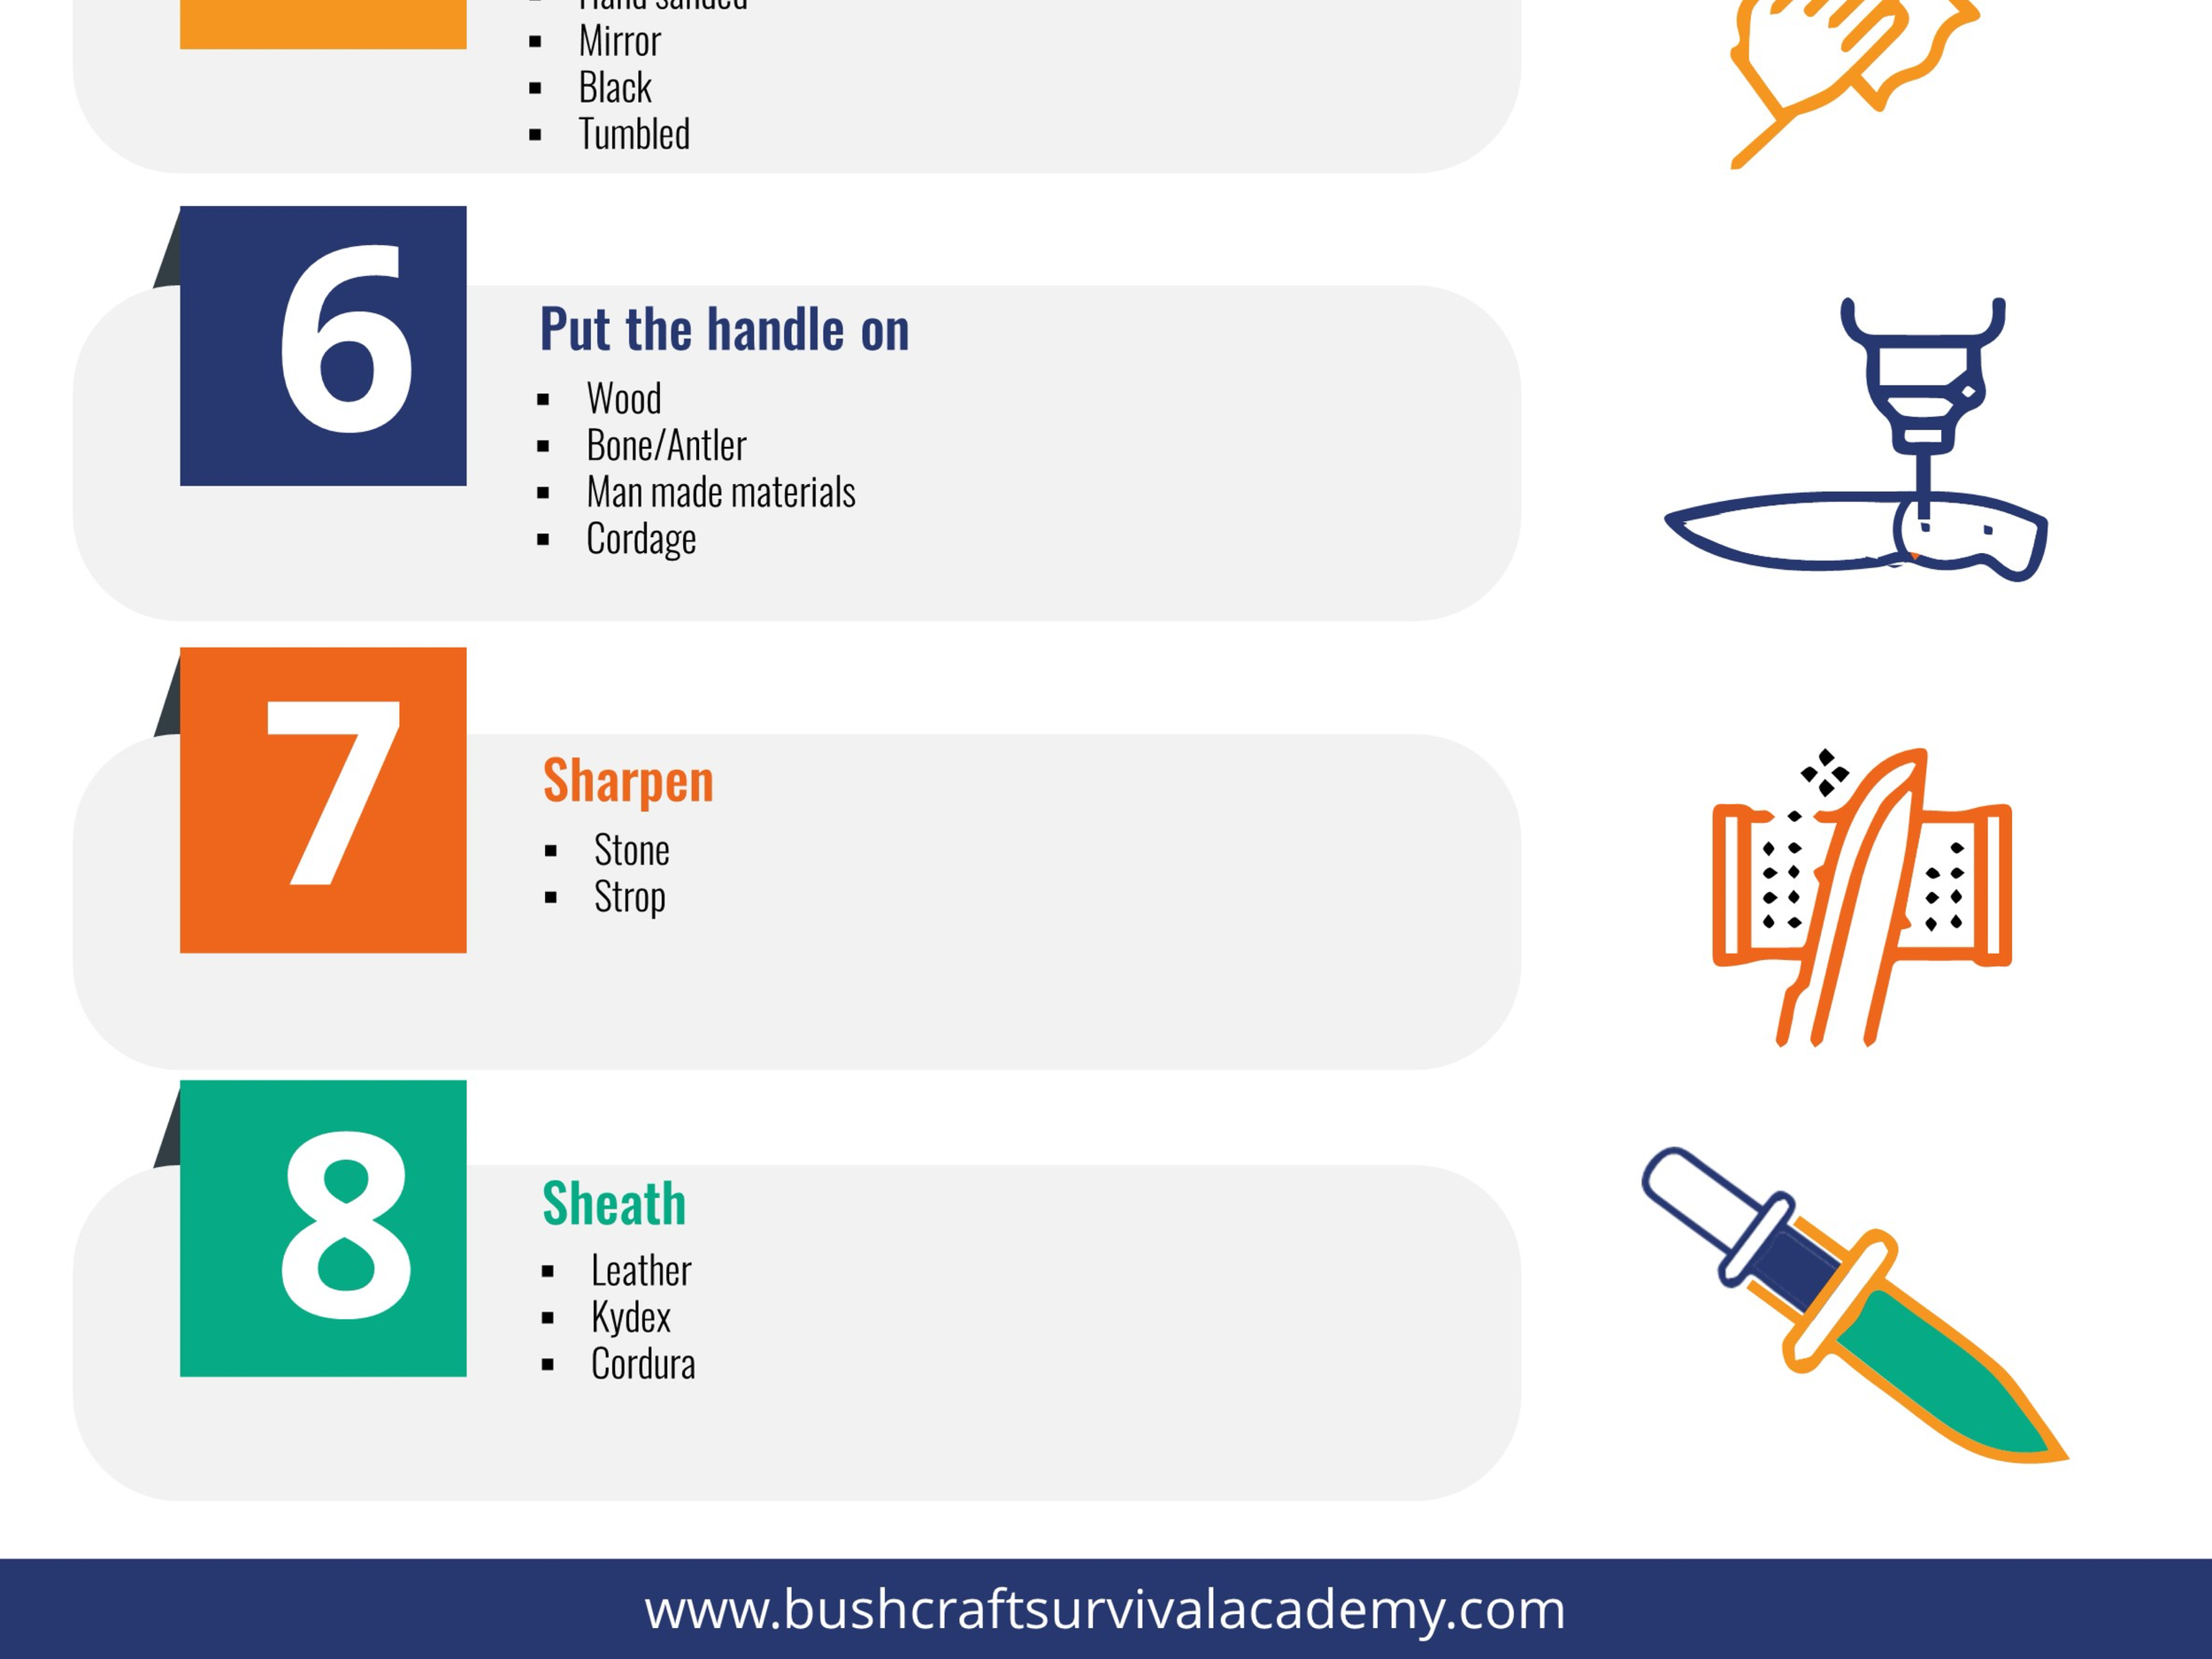
Beginners guide to Knife Making process Step 5 - Finish the blade
This step is all about the final look of the blade. A wide variety of knife finishes are available with the common ones listed here:
Forge finish
Hand sanded
Mirror
Black
Tumbled
Increasingly, specialised coatings are being used on knife blades rather that finishing the steel itself. Whilst some of these coatings are feasible for the home knife maker, many need specialised application to get consistent long lasting results. If a coating is your chosen option, you may wish to send your knife off to a specialist to get the work done.
The aesthetic you want to achieve will dictate the method chosen and the subsequent effort required to achieve this finish.

Beginners guide to Knife Making process Step 6 - Put the handle on
Few knives meet their intent without a suitable handle.
Ergonomics is the driving factor here. The handle has to be comfortable in the hand as well as functional. Consider the handle shape carefully for the intended use of the knife and the variety of grips this requires.
A wide variety of handle materials are used with these being amongst the commonest.
Wood
Bone/Antler
Man made materials
Cordage
Some of these come with their own challenges to work.
Early consideration should be given to both the handle material and its attachment method to ensure the required features are built into the blade at the shaping stage.
I now attach my handles after I have largely finished the blade as I have found it easier to hold the blade for finishing without the handle on. Protecting the blade from damage during this step is relatively straight forward however, allowance should be made for some minor remedial work just in case.

Beginners guide to Knife Making process Step 7 - Sharpen
Once the blade and handle are fully finished, the final edge can be put on using your chosen method of sharpening. The most basic version being a sharpening stone and strop.
In the long run, it is safer to sharpen the blade at this stage than it is to guard against accidental cuts through some of the earlier process stages.
Future Journal entries will consider sharpening methods and how to sharpen a knife.

Beginners guide to Knife Making process Step 8 - Sheath
The final stage of the knife making process is to provide a safe way of storing your knife. This could be a dedicated sheath, a storage box or a display or padded storage case.
Whilst not really a part of the knife making process, it would be a shame to let all of that effort go to waste by letting your knife get scratched or the edge damaged because it is being poorly stored. In addition, there are obvious safety implications to leaving unprotected sharp blades laying around.
Sheaths are both traditional and the common way of protecting the knife and have the added benefit of making it easy to carry your knife safely.
Common sheath materials include:
Leather
Kydex
Cordura/ ballistic Nylon
If you do not want to make your own sheath, there is a large cottage industry of independent sheath and holster makers who will be happy to help.
Beginners Guide to Knife Making - Summary.
There is no single best knife making process. Other makers will have their opinions on the stages to be followed and the order they should be undertaken in.
The process highlighted in this Journal entry works well for beginners who have limited tools and experience. I have highlighted some of the steps that can be modified or adjusted as I have gone through the process explanation and the reasons why. My recommendation is to stick with the process as defined here for your first few knives and decide what works for you. Over time, as your experience grows, you will develop your own processes that suits your style, tools and skills.
Good luck with your knife making and have fun!
I have created a handy process chart based on the above information that can be kept in your workshop and used as a quick reference guide. You can download it instantly for free from here:
